
Hello, back with another cutie patootie cabinet in the fairy theme.
Also, I just wanted everyone to know that I will soon be switching focus to smaller individual miniature accessories because I don't have enough time in my personal life to complete these larger pieces at the moment. I can complete smaller items far better right now so that's what I'll be doing. I so love the creative process of working on whole decorated furniture pieces but I simply can't find the time. I'll be making things like small animals, potion bottles, spell boards, cauldrons, potted plants and flower arrangements, wands, etc. So it'll be small things for quite some time while we roll on our bathroom renovations. Tonight I'm picking up some tile for a bathroom sink backsplash area, and I'll be tilting a wall for the first time in my life. so exciting! I can't wait to see how it turns out :)
I'm about to leave home soon so I'll have to keep this short and sweet :)
Description:
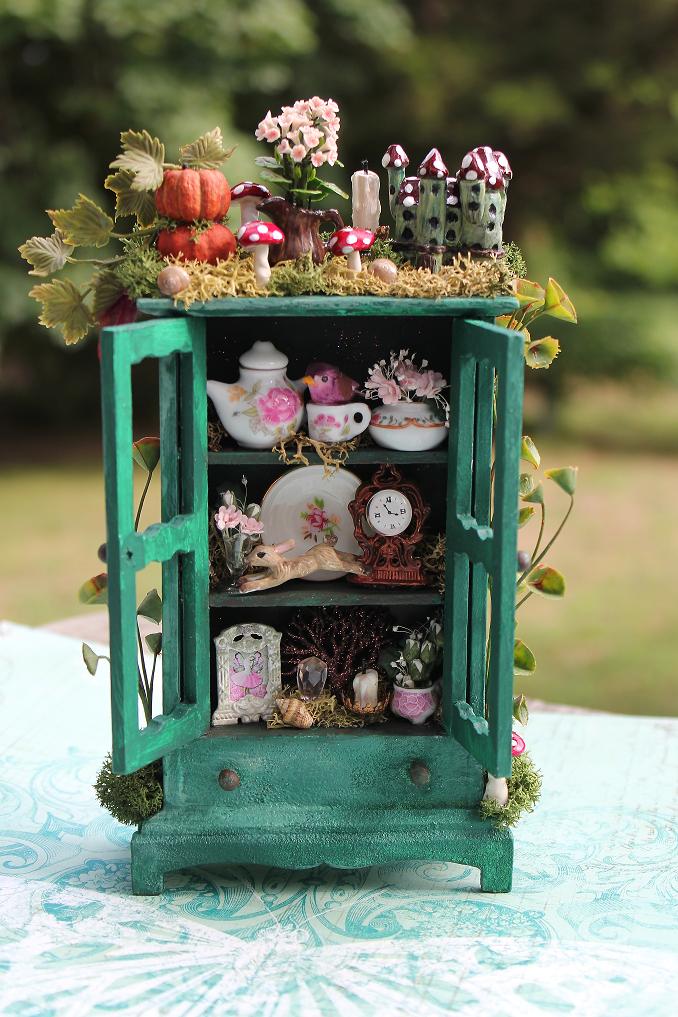
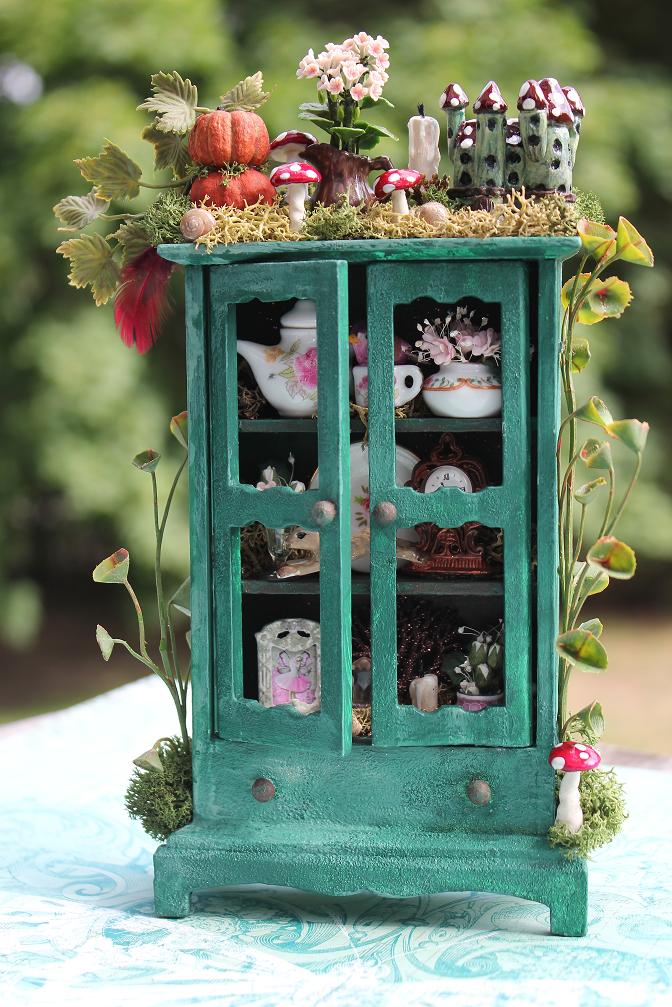
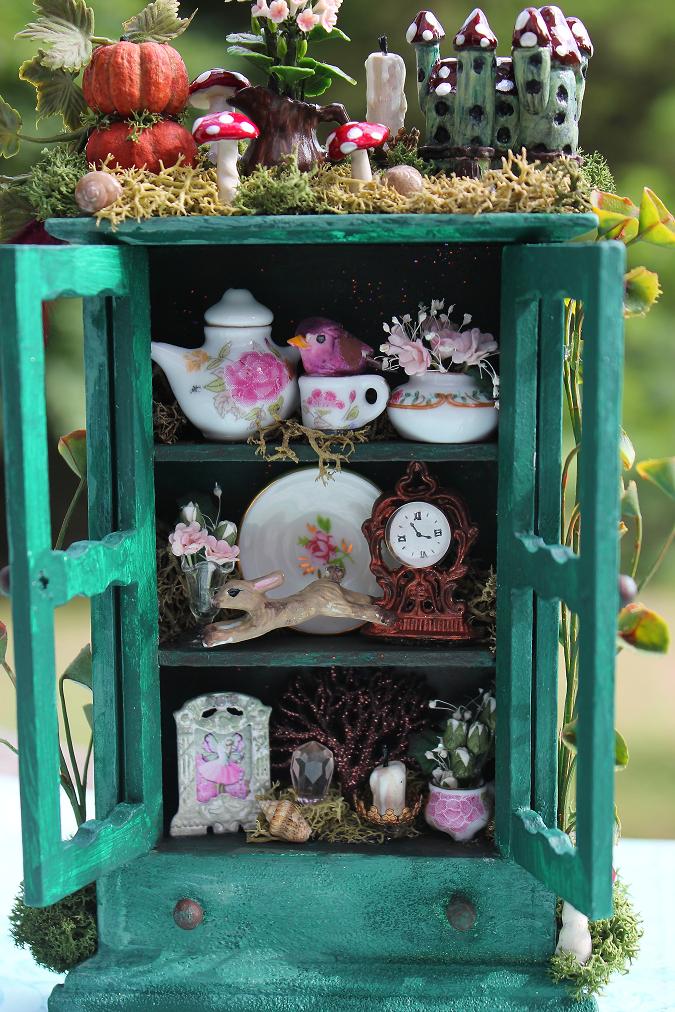
I just love making little fairy cabinets! They're so darling :) I think this one turned out very well. It's rustic and charming, a little woodland tea cabinet with china and flowers abounding. I can really see this tucked into some woodland glade, hidden at the base of a tree :) Perhaps in a hollowed tree opening even. The top is decorated thus:
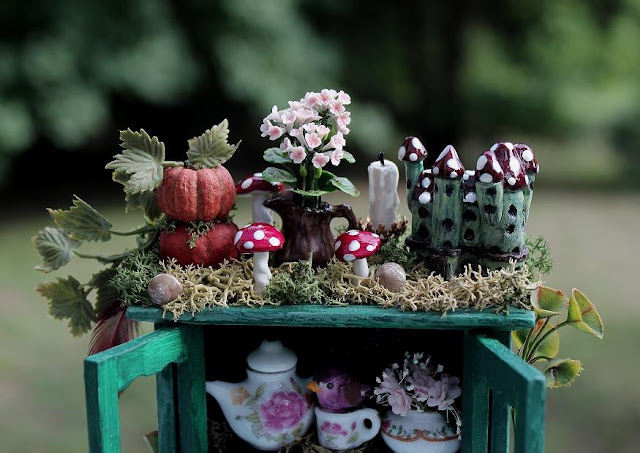
Pumpkin stack with vines, red cap mushrooms, a woodland flower arrangement, a tall pillar candle in holder, snail shells, mosses, and a fantastic tiny fairy castle in weathered greens and brown with rustic red and white spotted roof spires as though they were made of mushroom heads :) It's not photographing well, it's so much cooler in person.
The middle section of the cabinet includes:
Teapot, teacup, platter, a bronze mantle clock, floral arrangements, a framed portrait of a flower fairy, crystals, seashell, drippy candle, mosses, a running rabbit figurine, a tiny mushroom bird.
The outside of the cabinet is mossy, vined, and has one small mushroom growing from the base. Too cute!
Also, I just wanted everyone to know that I will soon be switching focus to smaller individual miniature accessories because I don't have enough time in my personal life to complete these larger pieces at the moment. I can complete smaller items far better right now so that's what I'll be doing. I so love the creative process of working on whole decorated furniture pieces but I simply can't find the time. I'll be making things like small animals, potion bottles, spell boards, cauldrons, potted plants and flower arrangements, wands, etc. So it'll be small things for quite some time while we roll on our bathroom renovations. Tonight I'm picking up some tile for a bathroom sink backsplash area, and I'll be tilting a wall for the first time in my life. so exciting! I can't wait to see how it turns out :)
I'm about to leave home soon so I'll have to keep this short and sweet :)
Description:
I just love making little fairy cabinets! They're so darling :) I think this one turned out very well. It's rustic and charming, a little woodland tea cabinet with china and flowers abounding. I can really see this tucked into some woodland glade, hidden at the base of a tree :) Perhaps in a hollowed tree opening even. The top is decorated thus:
Pumpkin stack with vines, red cap mushrooms, a woodland flower arrangement, a tall pillar candle in holder, snail shells, mosses, and a fantastic tiny fairy castle in weathered greens and brown with rustic red and white spotted roof spires as though they were made of mushroom heads :) It's not photographing well, it's so much cooler in person.
The middle section of the cabinet includes:
Teapot, teacup, platter, a bronze mantle clock, floral arrangements, a framed portrait of a flower fairy, crystals, seashell, drippy candle, mosses, a running rabbit figurine, a tiny mushroom bird.
The outside of the cabinet is mossy, vined, and has one small mushroom growing from the base. Too cute!

Available here: https://www.etsy.com/listing/159070255/dollhouse-miniature-tea-with-a-fairy?ref=shop_home_active
Have a good day everyone :) Hugs!


