Sunday, April 3, 2011

5 New Witch Hats Now in the Store!

Here's new and better pictures of one of the hats Sherry has made and is available in the store.  All previous pictures were Sherry's, and they are ok but she has trouble taking good pictures because she has no room to set up a proper photo taking area in her home.  Proper lighting and all that would help a lot.  She does the best she can, but I truly feel her pictures detract from how pretty the hats really are in person.  So when I got in this shipment, I retook the pictures of the last leather hat available in the store to show it in better lighting conditions.  All of the other hats would be the same in the correct photo setup and would look so much better in person as well.  Here are my pictures of the last leather hat in our store:


Newly listed witch hats by 19th Day Co-Creator Sherry:


All available at the links below each witch hat :)  Super cute and witchy little 1/12 scale miniature hats :)

Wednesday, March 30, 2011

Sherry's gone a little Witchy! Custom-Ordered Witch Hats

A lady ordered some witch hats from Sherry and I just have to show you guys her goodies :)  Now this Lady who ordered the hats has a cool website full of amazing buildings she's been building and filling herself!  You must go take a look at her wonderful Harry Potter buildings!  She's done the most amazing Hagrid's Hut ever!  So many others it's amazing and her buildings have been featured in several magazines as well!  They're that good :)  Here's her website:  http://www.salssite.com/
and you must click into it to see her great buildings! 

Now back to her custom witchy hats from 19th Day Miniatures Co-Creator Sherry (my Mom in Law)  who's blog is here:  http://19thdayminiaturessherrys.blogspot.com/
She's made some lovely hats out of quality top grain leather.  One of which is left from the order and available for sale in our etsy store:
http://www.etsy.com/listing/71138621/dollhouse-miniature-haute-couture-witch
and here's a picture of the only one left:


And here are pictures of the ones that were sold to the lady from the above website:

one side

the other side

And another:
And another:


and another:


Please contact Sherry via her blog:  http://19thdayminiaturessherrys.blogspot.com/
if you'd like to custom order a leather witch hat!

Update, now SOLD-Another Alice in Wonderland Talking Rose, ~Love

"He drew a circle that shut me out, but love and I had the wit to win. We drew a circle that took him in." ~Part of a quote by Charles Edwin.


I based this rose on this quote, I've always liked it. I think the message is a good one, work hard to show someone love and they won't be able to help themselves from someday loving you back. Love is love's reward :)

This little garden rose stands 2 and 3/4 inches tall, and has a larger face size than other roses I've done so far. I wanted to make a ground-planted rose that had some presence in a miniature garden setting. If you add this little darling in to your miniature garden, she will be noticed :)

She's so cute, her tendril vines look as though they are arms forming a circle above her head. She stands for love come full circle, just like the quote.

1/12 scale adult miniature, not for children as these roses are delicate sculptures and could be broken with rough handling.


Available for sale in my etsy store:


Tuesday, March 29, 2011

Update, now SOLD-Newborn baby Spring, Alice in Wonderland Talking Rose

I just wanted to show you guys one of three new roses coming to my store for general sale.  I'll post a new one tomorrow but this little guy is in my store right now. 

Spring is my inspiration for this tiny sculpture which stands 1 and 3/4 an inch tall. This darling baby boy flower is stretching his little tendrils in the dawning light, after a nice sleep in his hand-sculpted pot. Spring is about rebirth, of pale green shoots poking out of the earth and new flowers bursting forth. So for this little guy I used a pale, spring time green for his body, and it looks as though his little body is wrapped in a blanket of green. All except his little arms which are held up above his head into little curled tendrils as though he is stretching :)


Now my pictures are not too good, being that they were taken inside.  He's so cute in person, much better in person!

Available here in my etsy store:

I'll post the picture of the little girl ground-planted rose tomorrow after I finish her up :) 

Friday, March 25, 2011

Updated-Steampunk Adventurer's Table is completed, and back up for sale!

My client who was to buy this set has backed out of the deal due to family commitments, so the Steampunk Adventurer's Table is available once more :)  And it's all done as well.  I had it named previously the steampunk airship pilot's table but I felt this narrowed the scope a little too much.  I think this would belong to someone who traveled through all means, anywhere :)  Anyway, here it is without further ado:


Everything is handmade on it :)  I love this one very much!

Available here in my store:

Thursday, March 17, 2011

Steampunk Airship Pilot's Miniature Table

A friend of mine got me interested in Steampunk style, and the neo-victorian gadgetry look has me enthralled.  I'm a little late coming to this style, it seems everyone has done some sort of steampunk item.  That's ok, better late than never :)  I'm not finished, and I think this item quite possibly is sold already.  Also ok because I highly doubt this will be the last item I do in this theme.  It's just funky and flat out cool!  Yay steampunk!  Now figuring out how to build from the ground up something steampunk is quite wild.  It's not all that easy quite frankly.  It takes some imagination to figure out how to make something look viable and real, as if it might actually do something if you were to turn it on.  Especially in miniature, not too easy!  I've fiddled around with my project for about 3 days now.  It's coming together well, but it's not done.  I want to add more pieces to it because it's not full enough.  I'll explain as I post the pictures.  That would be the best way to convey what I want from it in the end. 
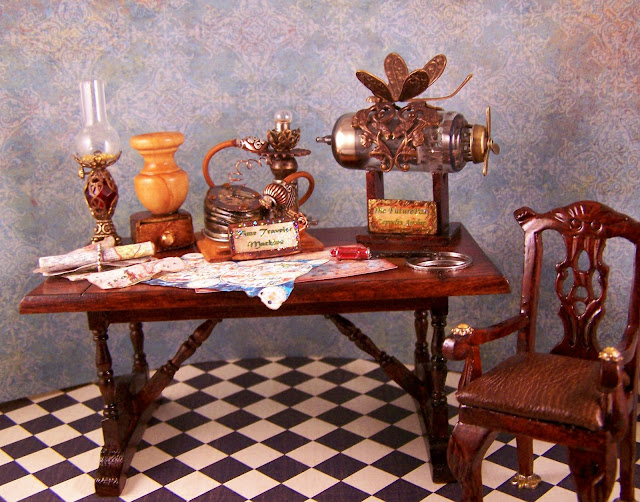
Ok my pictures never do anything I make justice first of all.  And like I said, so far from done right now.  I started with a light-colored table and darkened the finish.  A lot of victorian furniture was dark.  I redid an arm chair to match, adding gold details to it for it to fit the steampunk style better.  One thing steampunk isn't is plain.  The materials common in the style are wood, metal, leather, glass, etc.  Old fashioned machinery housed in wood casing.  So I recovered the damask seat in some nice leather.  It looks more masculine and fits the style.
I saw a necklace made to look like an old airship/dirigible/zeppelin and fell in love with it from this wonderful etsy shop:
.  Problem is, too bulky and awkward to wear.  But I thought it would make a great miniature so build it I did :)  I named The Futurepast Zeppelin Airship and put it on a plaque that I aged quite effectively with paints and stains.  I got the name from my favorite chapstick seller:  http://www.etsy.com/listing/59933003/on-sale-futurepast-spiced-raspberries
who also makes a killer mad hatter chapstick that tastes and smells out of this world in her other etsy store:  http://www.etsy.com/listing/59397073/a-hatter-madly-sugar-mango-flavor-orange
Ok enough about chapstick.  I know, I am an addict.  I hang my head in shame :)  Haha, jokes aside, back to my project:

the airship is not finished, I plan on hanging some netting over the back end that will hopefully drape over the side of the table and look cool :)  Maybe some ropes and also some billowed leather fins might look cool on the back end sides.  Who knows what I'll add.  But it's not elaborate enough for me yet.  And like I said, so much more going on this.  I just ordered some curly feathers to make nice feather quill pens to put in the empty wooden vase.  Plus I need to make a boss inkwell all tricked out as well.  A variety of beautiful old maps are piled around the table.  So hard to see them right there.  Oh I guess I could add the pictures on of them.


Aren't they beautiful?

There is a shot of the oil lamp I built from scratch that needs a good cleaning before I sent this table off :)  Yikes, smudgy!  I think I may add some red bling crystals to the base too.  I also built the little drawer unit beside the oil lamp and distressed the crap out of it to make it look old. 
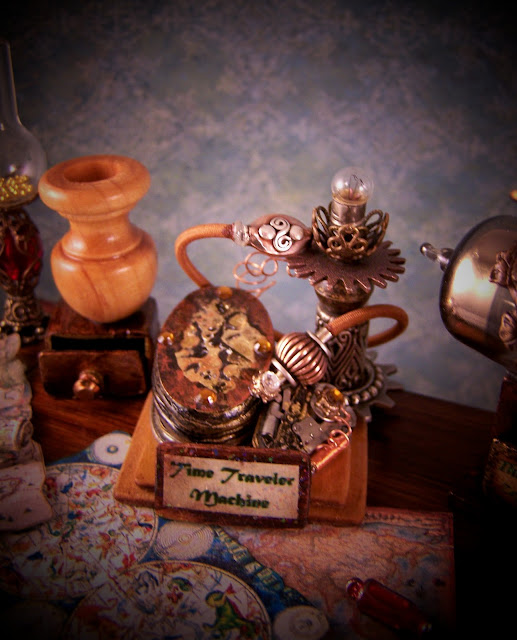
Here we have the slightly unfinished table top time traveler machine I built.  Wow fuzzy picture but you get the idea.  So much better and more detailed in person.  Here at the house, it looks fabulous.  I took an old watch and tore it to pieces.  I used the face and distressed it with several different paints then sealed it with clear coat.  Then I took polymer clay and made a set of billows the same size and shape as the watch face.  I added them on underneath the watch face.  Then I added the back piece of the watch to the bottom so there would be something metal under there.  Bling crystals in a nice amber tone were added to the watch face.  I wanted to keep it to metallic color scheme so nothing would stand out as fake-looking or too bright.  I made a double layered wooden base and stained it honey-colored to keep it from blending into the dark table top.  the front plaque isn't finished yet.  I plan to make it more elaborate.  The guts of the watch a repainted from solid stainless steel to various metal colors to age the look of it.  I added copper wires twirled into spirals for a more techy look.  A few more bling crystals and beads as well, you can never have enough bling :)  I added cloth-covered tubing because they didn't have clear plastic back then as far as I know :)  It looked older.  And a tiny dollhouse light bulb on top adds mechanical interest to the top post.  In person, it looks as though this thing could really do something.  Here in this picture?  Not so much :)  Well anyway, thanks for having a look and hopefully it was somewhat entertaining!  I'll post updates as I finish it up.             

Tuesday, March 15, 2011

Red Queen Cabinet, all done...and Steampunk Style Miniatures

Thank Heavens, the Cabinet is done!  Sheesh I never had much time for it :(  Little bit here and there as I could, and now it's complete :)  I'm very happy with it.  Without further introduction:

a tiny jewel box I made from scratch :)

"I need a pig here!  I love a warm pig belly for my aching feet."
These boots are painted exactly as I saw them in that scene on Alice in Wonderland.

Why leave the back undecorated?  All the bells and whistles on this cabinet :)

Yay!  I'm proud of this one :)  I love it!

Sherry's working on two custom trees for clients and I've been entreated by another from Italy to remake the Harry Potter chest set.  Another has begged for two Wonderland Roses.  I had closed down the custom order shop for awhile so I could make some things I had planned but alas I may not get to.  I've decided the best way to handle it is to work on projects I want to work on alongside those that are ordered.  Or else I may never lay my hands on those I'm itching to make.  For example, I'm really wanting to make a witchy tea cart and I even have the tea cart :)  And more so I wanted to work on something steampunk style.  Is anyone out there familiar with steampunk style?  It's a neo-victorian style of gadgetry that I'm loving at the moment.  I wanted to make a work table filled with gadgets and trinkets and all manner of steampunk things.  Here's a rather bad picture of the table I've darkened with stain and finished to look weathered and unique.  Better pictures as I progress will be forthcoming.  

And I saw a necklace made similar to this and fell in love with it, but could not wear it do to the size-it's just too bulky.  But I thought it could be made into a great miniature scene so I made it.  It's a Zeppelin, or Dirigible.  An old fashioned airship.  And it's not done yet.  I plan to add more to it.


Parts I bought to make into things for the table.  I'm not sure if I should put the Zeppelin on the table as though it is being built or if I should make a floor stand for it.  It might be cool to have it standing on the side so that I can add a little ship-type thing to the bottom of it.  I think I will.  I'll post updates as I work on it :)