Monday, January 30, 2012

Customer pictures of her Sweeney Todd Basement Scene and a larger BJ Doll Apothecary Chest

My dear customer has sent me pictures of her Sweeney Todd Pie Oven I made her sitting in the middle of her excellent roombox scene :)  With her permission I am posting them for you all to see because it's a cool little horror scene and fun to look at :)  Here's what she sent me, I know the Sweeney Todd fans out there will appreciate these:


The dolls were created by doll artisan Sharon Cariola from San Diego, California.  I made her the extra couple of buckets of bloody meat you see on the floor as well :)  Can't be Sweeney Todd without some blood and meat ickies, right?  I love her meat grinder you see in the background!  Thank you for permission to use and show your photographs Nancy!  Your roombox is coming along great :)

Here's what I've been making, and this is the last of my custom orders (for right now anyway) so I can get back to working on my other customer's rabbit hole.  This item pictured below is a custom built Elf's apothecary chest made for a 26" tall ball joint elf doll collection.  The measurements on this are 7 1/2 inches wide, 5 1/2 inches tall, a little over 3 inches deep.  The first pictures are of the building stage:

The lid was still off and one of the side doors wasn't hinged on yet at this point.  I was trying for very rustic, lord of the rings-ish design  like something the elves would have.  Here's the finished chest (minus some door hooks and the top medallion) that hasn't been filled yet with potions, etc.  I'm doing that tonight and tomorrow:


I love the handles, I made them out of 4 individual metal parts so they're one of a kind handles.  I'll post pictures when I get it all filled with stuff.
   

Tuesday, January 24, 2012

Miniature Sweeney Todd Mrs. Lovett's Pie Oven done

Again, my pictures are not even remotely turning out right now.   Winter time :(  I don't take the time to set them up properly because hey...I'm freezing!  One of many problems.  For some reason my camera seems to be popping out all of the lightly washed colors I used on the surface of the black oven to add depth and character.  So the silvery wash over the back is not this apparent in person, it looks much subtler.  Also the rusty areas where I added a dabble of antique copper is really jumping out in these pictures and looks a lot less bright and "stand outish" in person.  No idea why but the colors in it are appearing overly dramatic compared to how it looks in hand.  In person they all meld together and make it look old, worn, industrial, and rustic.  On here it just seems to look way worse :(  Anyways, here are the icky pictures I got:


You know one of these days I need a new camera. 
Here's a rather bad scene from the movie showing the oven briefly but first you might want to go shut off my blog's music player.  There's a stop button on the player:

Wow is that a ghastly scene!  Nothing like a woman getting tossed into a fire to send chills through you :o  I couldn't find another video showing the oven so that's the best I could do :(

I started with nothing but a metal pipe and some clay, and turned it into this :) It was pretty tough to do, being my first time of making something like this. But I think it worked out just fine.  This is wired to light up by 9 volt battery that's hidden inside a coal box in the back of the oven. The inside "fire" LED lights flash on and off in orange and red peeking from beneath a coal fire base with flickering "flames" shooting up out of the coal. Six gruesome bloody meat pies are baking on the metal rack inside and the blood is dripping on down into the fire. Don't take a bite, you may just find a finger inside! The outside has two separate independently swinging hinged doors that open and close as you like them. Slat cut-outs on the bottom of the door show the lights flickering through when the flames are lit. The coal box behind has a hinged lid that lifts which allows you to plug in the battery thus turning on the LED light unit.


Just under 9 inches tall, 5 1/2 inches deep at the base thanks to the coal box in back that was used to hide the battery pack and wires. 1/12 scale.

http://www.etsy.com/listing/91317661/reserved-custom-order-please-dont-buy


Sunday, January 22, 2012

Miniature Sweeney Todd Pie Oven, Miniature Alice in Wonderland update

Family interruptions aside, I've been working on these two orders as I can.  I think my Father thinks that now he's retired he might as well move into my house full time :)  My house has always been family central because it's the biggest in the most central location for everyone so yay me :)  I get everyone all of the time.  I guess that's what I get for putting in a large sectional sofa and two large flat screens complete with two game stations.  My house is the funnest apparently!  So I've been fighting for time to work in between dealing with everyone and cooking for extra people a lot.  I think I'll have the pie oven done in two days time, although you can't tell it from the pictures I'll be posting.  Right now it looks a bit rough and I have quite a bit left to do.  I've made a rough door but it needs to be clayed and painted and then hung so it will look really different in the end.  But I did manage to make two seperately swinging doors and the hinges will be partly hidden by clay in the end.  The coal fire is also in, although I forgot to turn the lights on while I shot my pictures outside in the freezing cold!  But it does indeed light up and the bulbs flash when you turn on the on button.  When I get the oven all done I'll turn the lights on before I shoot the pics.  Still left to do:  make the pies on the baking tray and add it inside above the fire, trim out the door and add metal rivets to the outside of the oven, clay the door and paint it out, detail clay the round little door that's on the front of the door and paint it, and make a coal box cover for the battery pack and wires to hide them from view.  So I have plenty to do and I've sworn off my company for awhile so I can get some work done.  They seem to forget that I have this to do as well.  Anyway here's what I have done so far:

It must have some blood inside, after all this IS Sweeney Todd themed :)


Like I said, still much to do.  I'm going to tone down the rusty-look parts of the outside because they seem a bit too much.  So I'll dabble some black back over that.  The rough-looking door will be clay covered, the hinges will be hidden mostly, the round door will be clayed to look like the one from the movie so it'll look way different, and I have some work to do yet on the paint all over the oven.  Not to mention that pie tray with meat pies and some blood dripping :)  It'll be so different when it's all done.  Plus these pictures are just plain awful.  It's so fun taking them outside in this frigid weather! 
They look pathetic every time right now :(   

And as for the rabbit hole, I've gotten the floor tiles in at least.  I went with a large red and white check, as per the disney movie.  I have a few more coats of clear to put on it but I had to wait on the air dry clay to set up properly before I could paint it.  Let me just say that working with air dry clay is suckish!  I hate the stuff.  It buckles, bumps out, tries to rise up off your project, does not stick well to other dried air dry clay, likes to cut in a very messy, non-clean edge way, etc.  The floor took me forever because I had to work on the messy lines that were left from me making the lines in the tile.  Funky stuff, it's terrible to work with :(  I have learned to put down a layer of good glue before adding on the clay anywhere to keep it held down as it dries so that's good.  At least I learned something :)  So here's what I have so far:

I took me two days worth of painting to get the floor looking right due to the funky clay I was forced to use in this case.  I can't just put the whole project in the oven can I :(  Yarg air dry clay!  After I get it clear coated enough I'm off to make the talking door knob and the curtains on their little rod that goes in the undone middle of the bottom wall.  Thank the Lord I get to use actual clay I can bake!  You can see in the pictures I also built out the clay area around the top so I have more space to add the cat, flowers, grasses, etc.  The top of the rabbit hole must have Dinah looking down at Alice as she falls.  That has to be repainted, and grassed, etc.  Looks pretty odd right now.


Wednesday, January 18, 2012

Progress report on Miniature Alice in Wonderland scene and Miniature Sweeney Todd Mrs. Lovett Pie Oven

I know I have some customers keeping up on their own projects I'm working on, so here and there I'll post pictures of these projects that take me a bit longer than normal ones to show them what's going on as well as everyone else :)  I think I may have just gotten a third custom order that's a whopper to do.  A collector of ball joint dolls in a much (much!) larger scale has been talking to me about doing possible projects for her collection of dolls in the two feet tall range.  YIKES!  That would mean the dolls would be just over 25 inches tall.  Wowsers.  Never tried that before!  But we'll see if she actually agrees to let me try.  What the heck, I can probably do it!  Here's hoping :)  She's talking an apothecary chest in the much larger size.  Hmmm, I love that theme! 

Anyways, here's some pictures of what I've done recently to my two other projects-the Alice in Wonderland Rabbit Hole scene and the Mrs. Lovett's Pie Oven:

Ok you can see here I'm still working on the walls.  I trimmed in the walls except where the talking door (the too small one for Alice to fit through) goes.  There will be a little door with sculpted face and curtains on either side that goes where that trim work is missing at the bottom.  And I have to clay in the floor tiles first before I add that because it must rest above the tiles.  I also gave the brickwork (which looked too new, perfect, and fake) a distress wash of dappled brown over the red bricks as well as a watery white wash over the whole thing to tone it down a bit more.  Now it looks much more natural and realistic in person.  The bricks now look like they have stood there for decades instead of like plastic yicky faux bricks.  I just noticed I have the mirror all grungy!  Oh well, nothing a little windex and a q-tip won't fix :)  And just look at that painty floor mess!  That will be covered completely with clay tiles so no bother.  You'll never know it was there in the end.  I like the progression of the walls as they go further down the tunnel.  I started them quite wild, the green trim work section has a more organic feel with imperfections and still some moss to show that it's just turning from rabbit hole to civilized abode.  That's why I went with the light green, to faze from dirt and moss to somewhat finished wall.  As it gets further down the habitation becomes more clear and civilized.  It becomes less of a rabbit hole and more of a round house down there.  And the bottom middle section of wall I did add a sparkle sprinkling to that wall to show that it has a magic to it that the others don't have.  It's the entrance to Wonderland, and I thought it would be nice to define that.  And this is what the original Disney movie had, the three different colored walls at the bottom of the rabbit hole.  And this is what my customer wanted, the original Disney version of it.  It will change so much as I work on it, this is still pretty basic compared to what will be in there in time.  And I am taking my time on this project because I want to do it well and not end up hating it or trying to rush through it because I've grown tired of messing with it.  I'm handling it gently and slowly working my way through all there is to do with it.  So I'm thinking there will more updates than you all could ever want to see lol.

And now for the Pie Oven:


Still trucking along on this as well.  There is extensive clay work to be done on the exterior of this, as well as a door to be made.  Man I'm shaking in my shoes over that one!  Have you seen the door?  It's a two door system and each door swings on it's own hinge system of course.  Still trying to figure out how to effectively hinge a door on this.  I'll have to find the tiniest metal drill bits ever to predrill holes through the metal side of the oven.  Then I can hang a door if I can manage that.  I'm planning on cutting another piece of metal from the same pipe I used to create this to make a door for it.  I'm going through cutting disks at an alarming rate on this project :)  They tend to break off during the cutting of the metal pipe.  And it's so fun to change the darn things out on my cutting tool!  Grrrrr.
Above photograph: the door mounted on the door, what the heck?!  Look at that thing!  Yikes.  I have to figure out how to make this :o   
 
As you can see, the original pie oven is wider looking.  I'm working within the measurements given to me by my customer, and she has limited room I think.  So mine is a bit thinner around, and it's still half an inch wider than specified.  Hopefully this will be ok with her!  If not I'm in trouble.  I'll have to drill holes through the bottom through which I'll run the lights for the coal fire.  I'll have to build that as well, a realistic looking coal fire to cover the bulbs from showing quite so much.  And I went with the larger 5 mm LED lights so this would really light up well as it shows in the pictures.  I want the whole inside to be well lit as though by a raging fire.  The battery pack is another problem.  How to hide it so you're not looking at an ugly 9 volt battery and wires?  I need to discuss this with my customer but I'm thinking a coal box cover for it either on the side or behind it, depending on where she has room for it in her scene. 


Monday, January 16, 2012

A Miniature Valentine's Cabinet, and the start of a menacing little Pie Oven :)

Valentine's Day is fast approaching, and it put me in the mood to made a lovey dovey OOAK cabinet :) I will not make another one of these, it was very time consuming and difficult. I started by painting the cabinet a teal green because it "pops" the color red so very well :) For the top of the cabinet I made a delicious little red rose, hearts, and chocolate cupcakes arrangement that is quite lovely in person. Beside it I placed my favorite love quote in a painted white and red sparkle frame with cabbage roses around it: "I love thee, I love but thee with a love that shall not die. Till the sun grows cold and the stars grow old, forever thy will be mine." It makes me think of my husband. So very romantic. Inside the cabinet on the first shelf is a very elaborate and beautiful cake on a filigree pedestal stand painted white. This is without a doubt the best cake I have made so far. It's beautiful in person! Next to that, rustic blue love birds in front of their "love nest" bird house. Finally a hearts tea set, painted very well to match the Valentine theme. Second shelf: a large metallic red rose, a white filigree vase of flowers, a "diamond" engagement ring and a high heel slipper shoe, a framed "Happily Ever After" quote. Third shelf: I made this into a mini scene complete with a large sculpted castle with red turrets and numerous windows, a grassy knoll with a road coming down it on which sits a horse drawn pumpkin coach :) I can only assume someones happily ever after is just beginning inside the castle :) The castle took me quite awhile to make and paint. So much detail packed into something so small! The castle stands about an inch and a fourth tall and about the same wide. Everything on this shelf is hand sculpted in meticulous detail considering it's so tiny! It's not exactly easy to make these tiny things!


And then I got this pie oven started (very basically). I can tell you one thing, cutting metal with a cutting tool is no fun. Sparks flew everywhere and I was pretty sure I might catch on fire lol. Imminent fires aside, I got it done. I spray painted the inside with a black texture paint so that's what's all over it. There will be extensive clay work all over this, so most of the outside will be covered in the end. And it will sit in a square clay "stone" slab. This is just cut and the tube has been joined together and inside painted-nothing more has been done yet. It will change greatly, and evolve as I work on it. I love this theme so I plan on pulling out all the stops on it to make sure it's as close to the original as possible. Right now it stands 7 inches tall, but it'll gain another inch or so before the end. 2 1/2 inches in diameter inside.


I'm not sure if I want to raise this door a little taller yet or not.  I might do that.  I might make the whole door wider and taller now that I think about it.  Oh well, more possible spark burns :o  This is the lighting unit I bought for it, a series of randomly flashing LED bulbs that will be partially hidden underneath a coal "fire" in the bottom of the oven.  This pack connects to a 9 volt battery pack, as per my customer's request.  They are available in actual dollhouse wiring though, so you can wire them to an actual electical plug in.


Thursday, January 12, 2012

Updated-Dollhouse Miniature Harry Potter Potions Master Chest of Ingredients completed

A couple new pictures showing details you couldn't see before:


*What you are looking at are pictures taken outside in a snowstorm :o My inside pictures never turn out, everything looks 10 times worse if I do that. So out I went, and the result isn't much better. Tiny snow bits show up on the miniature, so of course it doesn't really look all white spotty. The sky was dark so the pictures are still unclear and this is so incredibly MUCH MUCH nicer than these pictures show. I'm really proud of this mini, in person it's a visual feast for the eyes if you like witch or wizard miniatures.


Ok, that being said-I'll tell you about what you can't see in the photographs. The chest is black, with antique gold metal filigree pieces on the sides of the doors (which you can't see here) and also on the top of the chest. In the center of the filigree is a single tiny red crystal like on the drawer fronts. You can shut the doors on the sides and the top folds down as well, although they don't shut completely and there is a tiny gap because the cabinet is so stuffed with potions ingredients. Every nook and cranny is filled to the brim with bottles, filled bowls, and labeled ingredients of every kind from the books and movies. A list of included ingredients and potions:

-Ashwinder Eggs

-Bezoars (the thing Harry gave Ron when he was poisoned after eating chocolates containing love potion in the Half Blood Prince)

-Boomslang Skin

-Belladonna

-Mandrake Root

-Billywig Sting

-Black Beedle Eyes

-Venomous Tentacula Leaves

-Balm

-Bulbotuber Puss

-Amortentia Love Potion

-Acromantula Venom (from the giant spiders in the movie :)

-Bulbadux

-Asphodel

-Erumpent

-Vux Myristica

-Knotgrass

-Dittany

-Mushrooms

-Blood Root

-Bicorn Horn

-Doxie Eggs

-Bat Spleen
Each drawer contains the ingredient it's labeled for, such as tiny eggs, blood roots, tiny mushrooms, grasses, tiny sculpted horns and bat spleens, etc. All of the tiny bottles are well decorated and clearly labeled. The top of the cabinet holds small dishes holding various ingredients and they are also clearly labeled. A small Potion Book is strapped to the lid and it's made of real leather. It's removable should you want to take it out, although I would be careful if you do.
I'll try to get better pictures in the upcoming days if I can due to weather conditions here :( I really wish you could clearly see all of the wonderful details that this is packed full of. This is a highly detailed miniature that took me two days to make.
Here's my icky snow covered pictures of it:


Available here:


Tuesday, January 10, 2012

Updates on miniature projects and some progress on the Alice in Wonderland rabbit hole

I know I haven't blogged for awhile but I really really was so tired from Christmas and everything else going on.  I had to take a little break!  I was simply exhausted:  minis, redoing the floors, Christmas shopping and cookie making.  Not to mention all of the regular work around the house and cooking.  I think I slept for two days on and off from sheer exhaustion.  So I took some time off, working very sporadically.  I have gotten a little done, and I'm now getting back to work a lot more than I was.  Here's what I have done to the rabbit hole first of all, and keep in mind that I have so much more to do before I'll be happy with the inside enough to start adding in furniture and other things:
Much of this will be less visible anyway after I get stuff inside the hole.  And the bottom floor (the 3 different colored walls) are just started, they need the trim work like up above.  And each section I'm trying to give it's own individual look so they don't blend into each other so much as the original sculpture.  I want each section of wall to have a life of it's own like in the original Disney movie.  Like I said, still so much to do and add in.
It will evolve as I continue my work.  The outside has nothing new added but I have begun adding a large rim around the top so I can add a scene up there that will be full of life and cool things.  Right now it's nothing but raw clay with nothing added so it's not worth a look yet.
So anyways, that's where I'm at right now on that project. 

I'm waiting on a little help from my husband who has been too busy thus far to help with my meat pie oven project.  I bought a thin metal pipe thingy that needs to be hooked together and cut off (which is where he comes in).  I don't have the strength to use tin snips on it so I have to wait on him :o  But the fire unit came in the mail so I have a good start on supplies :)

Also, I have some interest in the upcoming Snow White and the Huntsman movie so I thought I'd make a creepy little gothic chest in honor of the new film.  This chest was made to me quite nefarious in nature, slightly gothic, and most definitely evil :) Evil in purpose anyway :) Why evil? Well what else could it be when it's made to hold poor Snow White's heart? The evil queen did in fact send the huntsman after her and asked for her heart to be brought back in a chest. And so I've made it: a tiny human heart in a jar of fluid, a long dagger/sword with a smidge of blood on the blade, a casting crystal orb on a stand, a poisoned apple, a bottle of poison apple potion as well. The outside has images of the evil queen (Charlize Theron) and snow white (Kristen Stewart) from the upcoming movie Snow White and the Huntsman. The inside has a classic Disney Snow White image of the evil queen and her magic mirror in the lid.
Here's my icky winter time pictures of it:


You can't see it but there's a heart inside the glass bottle :o  Pretty convincing!

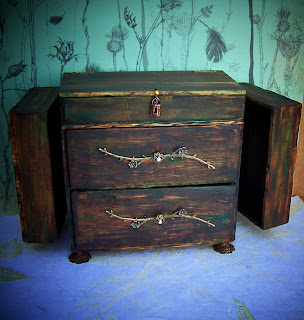
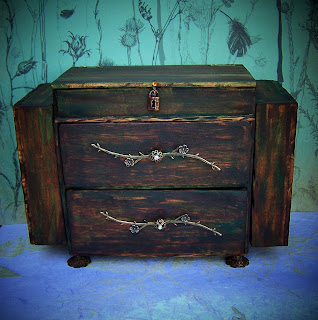
Finally I've had this jewelry chest sitting around for quite some time waiting on time to make it.  I didn't want to do a regular jewelry chest out of it, I wanted to make something neater.  So I decided to paint it black, stain the pink lining a dingy red, and make a wizard or witch ingredient chest out of it.  Like an advanced potion ingredient chest, with lots of labels with the names of Harry Potter potion ingredients on them.  There were some great potion and ingredient names from those books and movies.  I managed to find a long list of them.  Here's the cabinet, although it'll be far more tricked out in the end than what you see here:

This doesn't look like much right now, but give me time and you'll see a really cool miniature in the end :)  I plan on adding metal filigree details to the outside as well, and this will be one of a kind because I only have one of these chests.
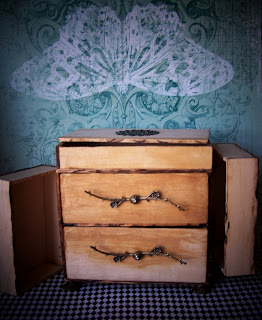
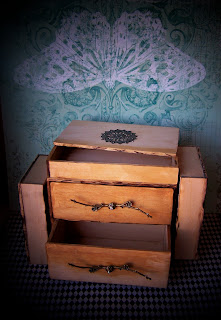