Showing posts with label miniature fireplace. Show all posts

Tuesday, October 14, 2014

Dollhouse Miniature Sewing Witch Halloween Christmas Tree and Fairy Fireplace 1/12 scale

Hey everyone, I have a couple new miniatures I haven't posted yet so I wanted to share them with you.  I have a new theme tree done and only one more planned for the rest of this year.  This one that's done is a sewing witch tree similar to one my MIL Sherry made years ago.  I never made one and I had one mini sewing machine left so I figured I'd make one too.  Here it is:


Description:
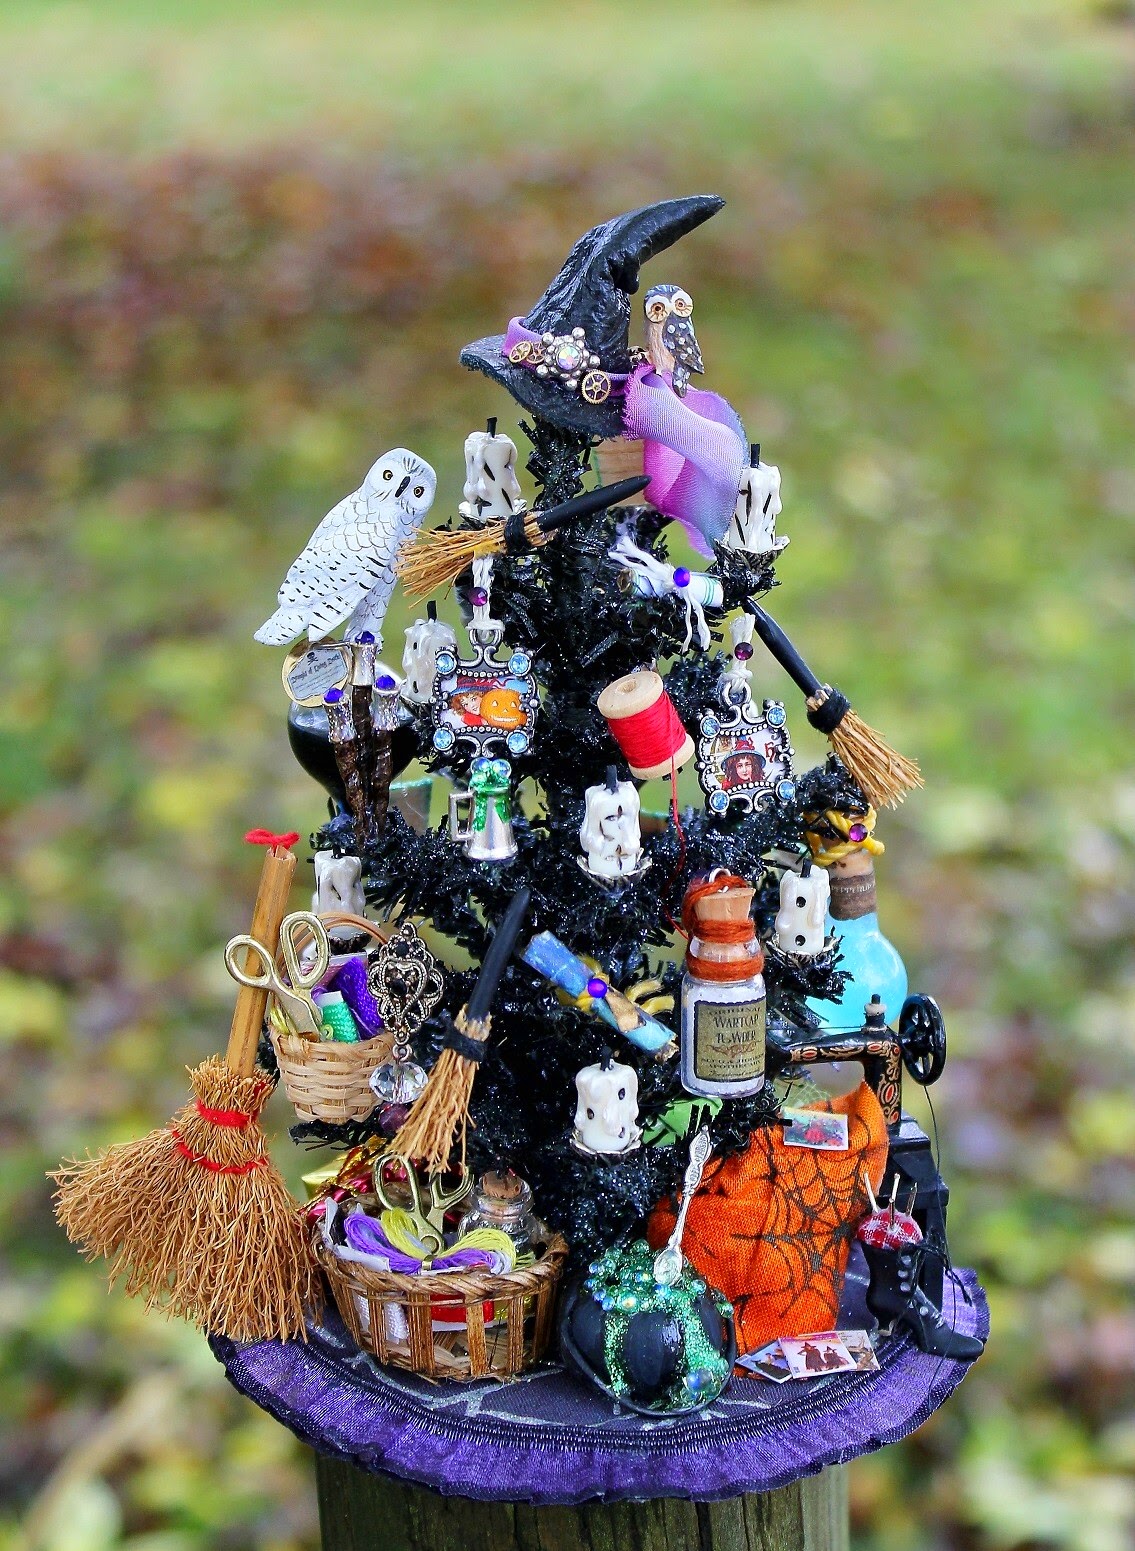
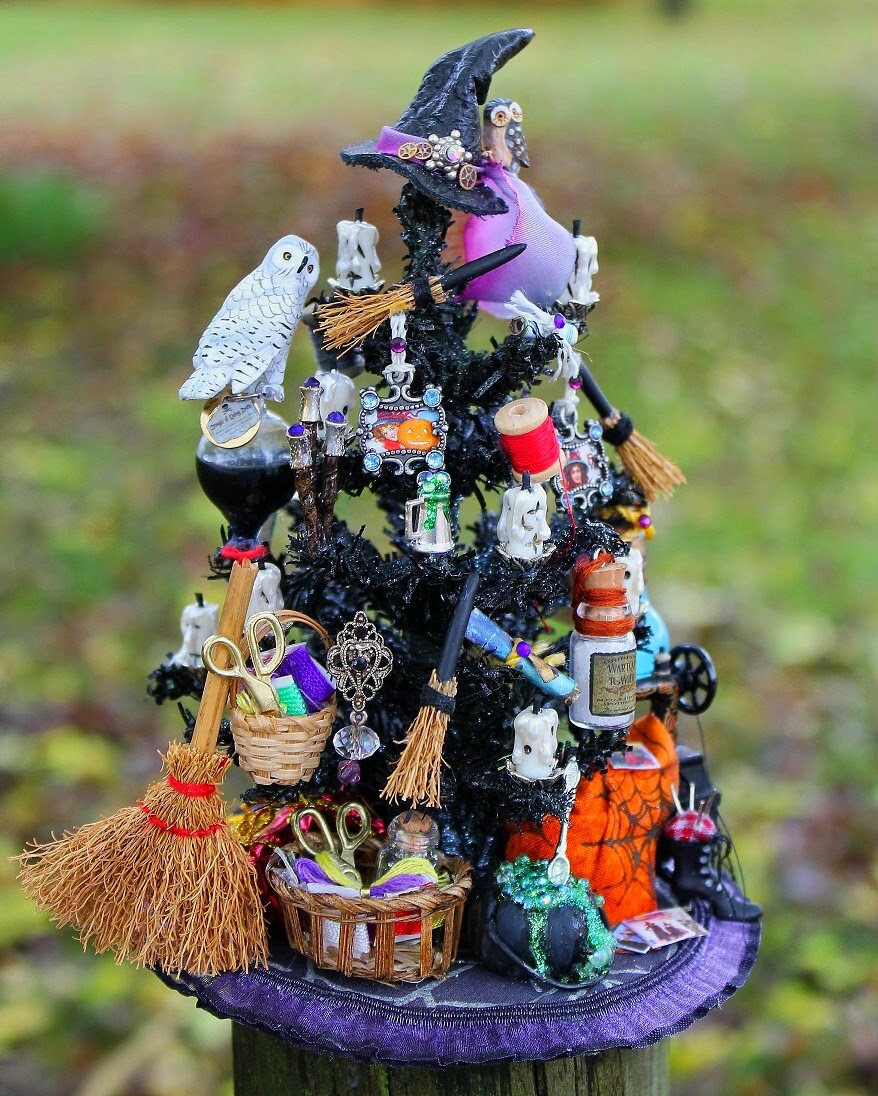
Even witches need a holiday that doesn't involve tricks or treats! This tree belongs to a crafty little witch, who knows how to turn a stitch :) She likes her trees black, her hats pointing and droopy and tricked out fancy, her potions nefarious, and her sewing is divine! What a woman!
This tree reflects her personal style. Topped with a jaunty leather witch hat with a tiny owl clutching onto the side while a snowy owl perches below on the tree, the rest of the tree is covered in tiny brooms, potions, candles dripping wax, all sorts of witchy goodness. Underneath the tree sits an antique singer-style sewing machine working away with a pile of tiny sewing patterns for various witch outfits sitting around it. Sewing baskets, a witch boot pin cushion with needles, a bubbling cauldron with oozing green potion, a cute little broom decorate the base of the tree on a witchy tree skirt. This tree is completely tricked out and hand-crafted from top to bottom. Amazing!

This tree measures roughly 7 inches tall, close to 5 inches wide at the base give or take a little because of the stuff sticking off the sides.
Available here:
https://www.etsy.com/listing/207151429/dollhouse-miniature-sewing-witch?ref=shop_home_active_1

And this is a fairy fireplace I did beforehand:

Available here:

Wednesday, January 23, 2013

What I've been up to lately in Dollhouse Miniatures :)

Ok I have been working, I just haven't blogged for awhile.  Really busy around here like usual, yikes.

Here's what's come up since I last blogged, although some of it has now sold:

Fairy fireplace (sold)
Steampunk Wizard/Witch floor chest with Leafy Forest Dragon guarding her eggs (available)
Cottage style magically pouring fairy tea set (sold)
Romantic style magically pouring fairy tea set (sold)

And finally this I just finished up today, another fairy sewing notion cabinet and stool set:


Available here:

And I'd like to post a link to Sherry and I's jewelry shop once again:

Some new things will soon be added to that shop as well.  And many nice things are currently in there now :)


Tuesday, January 24, 2012

Miniature Sweeney Todd Mrs. Lovett's Pie Oven done

Again, my pictures are not even remotely turning out right now.   Winter time :(  I don't take the time to set them up properly because hey...I'm freezing!  One of many problems.  For some reason my camera seems to be popping out all of the lightly washed colors I used on the surface of the black oven to add depth and character.  So the silvery wash over the back is not this apparent in person, it looks much subtler.  Also the rusty areas where I added a dabble of antique copper is really jumping out in these pictures and looks a lot less bright and "stand outish" in person.  No idea why but the colors in it are appearing overly dramatic compared to how it looks in hand.  In person they all meld together and make it look old, worn, industrial, and rustic.  On here it just seems to look way worse :(  Anyways, here are the icky pictures I got:


You know one of these days I need a new camera. 
Here's a rather bad scene from the movie showing the oven briefly but first you might want to go shut off my blog's music player.  There's a stop button on the player:

Wow is that a ghastly scene!  Nothing like a woman getting tossed into a fire to send chills through you :o  I couldn't find another video showing the oven so that's the best I could do :(

I started with nothing but a metal pipe and some clay, and turned it into this :) It was pretty tough to do, being my first time of making something like this. But I think it worked out just fine.  This is wired to light up by 9 volt battery that's hidden inside a coal box in the back of the oven. The inside "fire" LED lights flash on and off in orange and red peeking from beneath a coal fire base with flickering "flames" shooting up out of the coal. Six gruesome bloody meat pies are baking on the metal rack inside and the blood is dripping on down into the fire. Don't take a bite, you may just find a finger inside! The outside has two separate independently swinging hinged doors that open and close as you like them. Slat cut-outs on the bottom of the door show the lights flickering through when the flames are lit. The coal box behind has a hinged lid that lifts which allows you to plug in the battery thus turning on the LED light unit.


Just under 9 inches tall, 5 1/2 inches deep at the base thanks to the coal box in back that was used to hide the battery pack and wires. 1/12 scale.

http://www.etsy.com/listing/91317661/reserved-custom-order-please-dont-buy


Sunday, January 22, 2012

Miniature Sweeney Todd Pie Oven, Miniature Alice in Wonderland update

Family interruptions aside, I've been working on these two orders as I can.  I think my Father thinks that now he's retired he might as well move into my house full time :)  My house has always been family central because it's the biggest in the most central location for everyone so yay me :)  I get everyone all of the time.  I guess that's what I get for putting in a large sectional sofa and two large flat screens complete with two game stations.  My house is the funnest apparently!  So I've been fighting for time to work in between dealing with everyone and cooking for extra people a lot.  I think I'll have the pie oven done in two days time, although you can't tell it from the pictures I'll be posting.  Right now it looks a bit rough and I have quite a bit left to do.  I've made a rough door but it needs to be clayed and painted and then hung so it will look really different in the end.  But I did manage to make two seperately swinging doors and the hinges will be partly hidden by clay in the end.  The coal fire is also in, although I forgot to turn the lights on while I shot my pictures outside in the freezing cold!  But it does indeed light up and the bulbs flash when you turn on the on button.  When I get the oven all done I'll turn the lights on before I shoot the pics.  Still left to do:  make the pies on the baking tray and add it inside above the fire, trim out the door and add metal rivets to the outside of the oven, clay the door and paint it out, detail clay the round little door that's on the front of the door and paint it, and make a coal box cover for the battery pack and wires to hide them from view.  So I have plenty to do and I've sworn off my company for awhile so I can get some work done.  They seem to forget that I have this to do as well.  Anyway here's what I have done so far:

It must have some blood inside, after all this IS Sweeney Todd themed :)


Like I said, still much to do.  I'm going to tone down the rusty-look parts of the outside because they seem a bit too much.  So I'll dabble some black back over that.  The rough-looking door will be clay covered, the hinges will be hidden mostly, the round door will be clayed to look like the one from the movie so it'll look way different, and I have some work to do yet on the paint all over the oven.  Not to mention that pie tray with meat pies and some blood dripping :)  It'll be so different when it's all done.  Plus these pictures are just plain awful.  It's so fun taking them outside in this frigid weather! 
They look pathetic every time right now :(   

And as for the rabbit hole, I've gotten the floor tiles in at least.  I went with a large red and white check, as per the disney movie.  I have a few more coats of clear to put on it but I had to wait on the air dry clay to set up properly before I could paint it.  Let me just say that working with air dry clay is suckish!  I hate the stuff.  It buckles, bumps out, tries to rise up off your project, does not stick well to other dried air dry clay, likes to cut in a very messy, non-clean edge way, etc.  The floor took me forever because I had to work on the messy lines that were left from me making the lines in the tile.  Funky stuff, it's terrible to work with :(  I have learned to put down a layer of good glue before adding on the clay anywhere to keep it held down as it dries so that's good.  At least I learned something :)  So here's what I have so far:

I took me two days worth of painting to get the floor looking right due to the funky clay I was forced to use in this case.  I can't just put the whole project in the oven can I :(  Yarg air dry clay!  After I get it clear coated enough I'm off to make the talking door knob and the curtains on their little rod that goes in the undone middle of the bottom wall.  Thank the Lord I get to use actual clay I can bake!  You can see in the pictures I also built out the clay area around the top so I have more space to add the cat, flowers, grasses, etc.  The top of the rabbit hole must have Dinah looking down at Alice as she falls.  That has to be repainted, and grassed, etc.  Looks pretty odd right now.


Monday, January 16, 2012

A Miniature Valentine's Cabinet, and the start of a menacing little Pie Oven :)

Valentine's Day is fast approaching, and it put me in the mood to made a lovey dovey OOAK cabinet :) I will not make another one of these, it was very time consuming and difficult. I started by painting the cabinet a teal green because it "pops" the color red so very well :) For the top of the cabinet I made a delicious little red rose, hearts, and chocolate cupcakes arrangement that is quite lovely in person. Beside it I placed my favorite love quote in a painted white and red sparkle frame with cabbage roses around it: "I love thee, I love but thee with a love that shall not die. Till the sun grows cold and the stars grow old, forever thy will be mine." It makes me think of my husband. So very romantic. Inside the cabinet on the first shelf is a very elaborate and beautiful cake on a filigree pedestal stand painted white. This is without a doubt the best cake I have made so far. It's beautiful in person! Next to that, rustic blue love birds in front of their "love nest" bird house. Finally a hearts tea set, painted very well to match the Valentine theme. Second shelf: a large metallic red rose, a white filigree vase of flowers, a "diamond" engagement ring and a high heel slipper shoe, a framed "Happily Ever After" quote. Third shelf: I made this into a mini scene complete with a large sculpted castle with red turrets and numerous windows, a grassy knoll with a road coming down it on which sits a horse drawn pumpkin coach :) I can only assume someones happily ever after is just beginning inside the castle :) The castle took me quite awhile to make and paint. So much detail packed into something so small! The castle stands about an inch and a fourth tall and about the same wide. Everything on this shelf is hand sculpted in meticulous detail considering it's so tiny! It's not exactly easy to make these tiny things!


And then I got this pie oven started (very basically). I can tell you one thing, cutting metal with a cutting tool is no fun. Sparks flew everywhere and I was pretty sure I might catch on fire lol. Imminent fires aside, I got it done. I spray painted the inside with a black texture paint so that's what's all over it. There will be extensive clay work all over this, so most of the outside will be covered in the end. And it will sit in a square clay "stone" slab. This is just cut and the tube has been joined together and inside painted-nothing more has been done yet. It will change greatly, and evolve as I work on it. I love this theme so I plan on pulling out all the stops on it to make sure it's as close to the original as possible. Right now it stands 7 inches tall, but it'll gain another inch or so before the end. 2 1/2 inches in diameter inside.


I'm not sure if I want to raise this door a little taller yet or not.  I might do that.  I might make the whole door wider and taller now that I think about it.  Oh well, more possible spark burns :o  This is the lighting unit I bought for it, a series of randomly flashing LED bulbs that will be partially hidden underneath a coal "fire" in the bottom of the oven.  This pack connects to a 9 volt battery pack, as per my customer's request.  They are available in actual dollhouse wiring though, so you can wire them to an actual electical plug in.


Sunday, January 1, 2012

Dollhouse Miniature Designer Cabinet Completed :)

Remember the Gucci bag cabinet project?  It's all done now and listed.  My pictures are horrid (and they will be until well into spring thanks to winter weather) but I'll post them anyway.  I wish you all could see how nice this actually is!  It's a cutie in person.


Oh the dang camera glare!  It makes everything look washed out and icky :(


Oy vay :(  Wow do I need a new camera or what???

Haha I just now noticed the buckles on the little strappy sandal heels are wrong.  I guess I need to add one on the correct side of the other shoe, duh me!  Sheesh, I guess I was a bit tired last night when I finished that shoe up :)  I wish you could see those in person though, they are really good ones.  I was kind of proud of myself on those, making tiny shoes-especially strappy high heel ones is really hard to do.  And the little handbags are to die for!  Just darling :)

I'm still working on the rabbit hole, I'm currently adding the criss-cross boxy trim work and it's not fit to be seen yet.  So no pictures until I'm done, and nearly every color of the walls when it changes has that.  And I also have to do some brickwork as well, so it may be a little while before I can show it. 

And I had a second custom order request as well.  Do you all remember the Mrs. Lovett's Pie Counter? 

The lady who bought it has commissioned another piece to go with it based on this:


The meat pie oven!  I've ordered the fire unit for the bottom with flickering LED lights so I am super excited to try it out :)  This lady has a lovely set up for displaying her Sweeney Todd stuff complete with a shop and some well done artisan dolls so I can't wait to see it all put together.  She even has a brick oven similar to the one in the film in the kitchen scene.  She's still collecting parts but she's promised to provide some pictures when she gets somewhere on it.  How fun!


Monday, November 14, 2011

A Series of Miniature Holiday Fireplaces bring in the "cozy" to dollhouses :)

The weather has turned colder here and we've even seen some snow fly!  I personally love this time of year, all tucked in like bears for the winter :)  The only thing is I worry about my loved ones on the roads and also I have a really hard time getting decent pictures inside.  Often I have to gear up and head outside to shoot my pictures anyway.  You'll see a drop in the quality of my pictures most likely :(  Either because they've been shot inside in my photocube or else I was hurrying through my pictures outside because I was freezing!  Either way, no matter how good I make something it'll look worse now :(  Bad pictures make a good miniature look bad too.  Tis the season to freeze or provide crappy pictures.

Anyways, I caught a cold and haven't been working or blogging like usual.  Did I say I loved this time of year?  Ugh, mental!  Hehe.  I've done three different fireplaces for the holidays though, because this time of year makes me wish I had one in my real house!  What could be cozier than a warm fire in a lovely fireplace during a cold winter?  Nothing that I can think of.  So I made three of them in three different styles:  a stylish modern-more adult fireplace, a harvest home fireplace with a pie baking, and a child's theme fireplace with gifts galore :)  I'll shush up and just show you :


The pictures above are of the modern adult fireplace complete with a candy cane martini and icy arrangement that looks like those in high-end stores during the holidays.  There's even a little mouse all wrapped up in Christmas bows and holding a bowed candy cane :)  He's so cute in person!

(Remember my pictures aren't too good right now and these are better in person by far!)

And now the home hearth fireplace:


and finally my favorite, the child's Christmas wish fireplace:


What you can't really see are the tiny cute little gingerbread men cookies and the two signs aren't easy to read in these pictures but are in person.  The one with the cookies reads:  "Dear Santa, We left some cookies for you to eat, so take a break and rest your feet!", and the one above the fire reads:  ""Dear Santa, define good..."
That really reminded me of my own kids, hehe!  I had to put it on because it makes me smile.

These are all available here in my store: 
http://www.etsy.com/shop/tarayvonne

Up next will be a miniature mermaid chest decorated like a treasure trove and then some more Harry Potter minis in the near future!  If you haven't seen the last movie you have to run out and buy it immediately!  It was epic :)