Showing posts with label miniature dollhouse. Show all posts

Wednesday, August 13, 2014

Tuesday, June 3, 2014

News and upcoming miniature projects :)

Hey everyone!  How's your summer going so far?  Good I hope?

Well we're in a whirlwind of activity at the ole Hays House, still in the middle of house-wide renovations as well as decluttering and cleaning out the house of all unnecessary junk.  Don't you just hate that?  You look around and figure out that the place is a cluttery mess and you have to do a "house purge" to get everything cleaned out and reorganized.  In my case, I had 15 years of stored crap in my basement that has to go before I lose my marbles.  My workroom has been moved downstairs due to lack of space anywhere else (which is why I wasn't working on minis for so long), and as it is I'm starting to feel like the thing under the stairs in the deep recesses of the house.  Yikes.  Must. Get. Junk. Out. Now.

So that's what we're doing.  And laying kitchen tiles as the same.  And I'm trying to work on minis as well now.

I was contacted by the new editor of American Miniaturist Magazine and invited to submit work for the upcoming Halloween edition.  Right about that time, I got the blue screen of death on my computer and lost all my previous work photos until I get someone to fix it.  Ugh.  Do you ever get the feeling after a rash of bad luck that you're under some sort of curse?  I'm starting to think I've got a curse on my head :)

So anyway, I'll be making some new really good (I hope) minis for that and shooting some new photos since my oldies are currently under blue screen lock down.  I hope something ends up being good enough for publication-that would be so much fun!

I'm currently working on a low side cabinet in the Honeydukes theme which I plan on pulling out all the stops on.  It should be pretty exciting.  I've been getting some requests for more of that theme so I must do a few pieces before I get started on my spooky Halloween stuff.  Speaking of that, I just redid Sherry's (my MIL) Marie Antoinette doll, table and chairs set she made previously.  I really felt it needed to go in a different and more exciting direction and that her hand-sculpted doll would be much more fun as a Halloween type miniature instead.  So she has been re-imagined into the ghost of the Countess Bathory, the infamous blood countess from Hungary.  For the horrific story of what she did, view her wikipedia article:
http://en.wikipedia.org/wiki/Elizabeth_B%C3%A1thory        

Oh my goodness, what a crazy woman!  So anyway, I thought it would be neat to make a miniature of her and her atrocious interests for Halloween.  Check out the bloody axe on the table top:

 To make a long story short, she was rumored to have bathed in the blood of her beautiful young victims (possibly numbering in the hundreds if the witnesses were credible) in an effort to stay young herself, as well as drinking the blood. In essence, she was a complete psychopath! Sherry did a wonderful job making her beautiful in sculpt, hair and dress while I took the pleasuring in painting her skin/eyes to look white and sparkly (ghostly) with the blackness of her soul running down her face. She is meant to look tattered, ghostly, haunting, and spooky. In her hand, a wine glass of blood from one of her victims. I decorated her table to reflect her terrible hobbies: bloody candelabra with bleeding candles, bottles and tottles of unknown nefarious purposes, a handcrafted bloody axe, Transylvanian Gazette newspaper, fortune telling orb, a bottle of vampiric blood, a book on vampire forensics, a death warrant scroll, a terrible place setting with a severed skeleton hand holding a red rose, silverware-all covered in ghostly white spiderwebs with one little spider perched on top of a red rose flower arrangement. Tatty black tablecloth covers the table top as well. 
Fit for the finest haunted house or room box in your home :)
Available here at this clickable link below:
Please stay tuned for soon to be new Harry Potter items that I'm currently working on.

Have a good summer and have some adventures everyone!  Hugs-Tara


Thursday, April 17, 2014

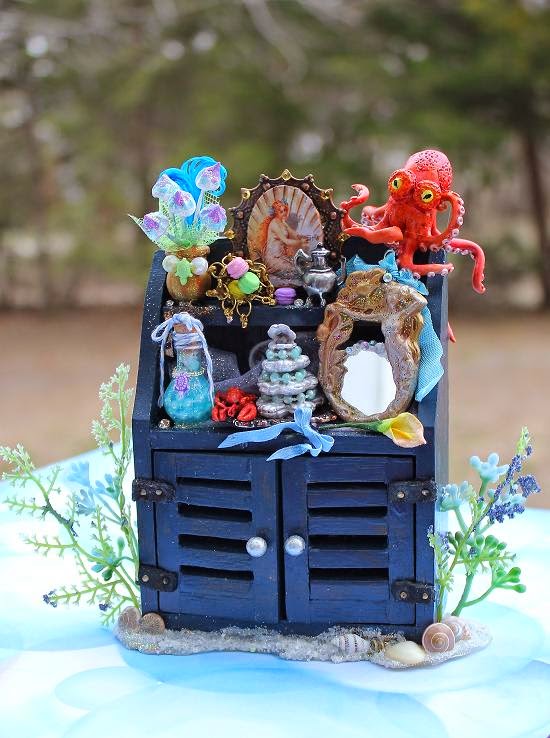
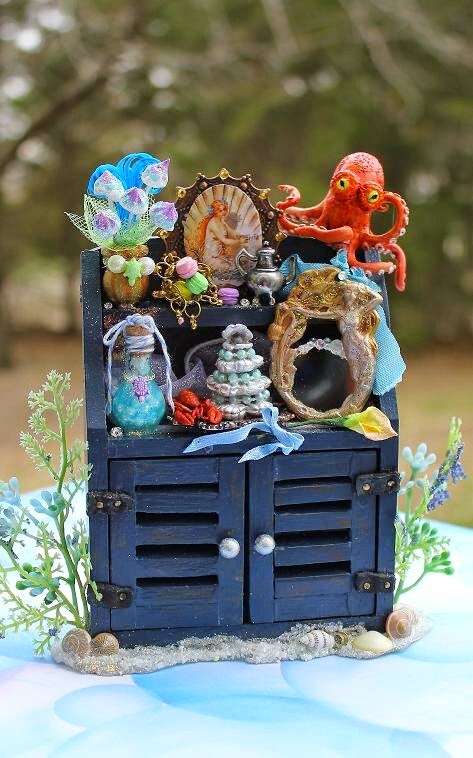
Dollhouse Miniature Nautical Mermaid Cove Grand Buffet 1/12 scale

Hey everyone, long time no see right?  I've been very busy working on my house and haven't had much time for minis for quite awhile.  Sad :(  Part of my problem is I took my work room and made it into a much needed bathroom upstairs.  Nothing worse than trudging down the stairs in the middle of the night to go to the bathroom.  Too much information right???  Well it did really bum us out to have to do that.  So now I'm lacking a proper work space.  It's much harder to make minis when you feel displaced and have no decent area to work in.  No matter, I'm soon to be fixing up the basement in order to have a work space of my own again.  Hopefully before you know it I'll be churning out minis left and right all over again.  I really look forward to having a work space.  It's be wonderful to be able to be creative again.  Anyway, I did manage to get a moment to myself to make a cute little mermaid buffet cabinet and I have to say that was quite a job.  I sculpted some ea creatures and they weren't easy to do for me.  I do think they turned out quite well though, despite that.  I'm sad they didn't photograph as well as they look in person though.  I feel they are really detailed in person, but it doesn't show up well in the photos.  Well here goes nothing:


I've managed to get glitter all over it, which shows up as specks on the cabinet finish.  It's quite pretty in person and yet looks like dust in the pictures, ugh.  And my octopus seems to have a glue stingy behind his leg, which I have pulled off now.  Oops, my bad :)

What's on this: cake pop display in a vase, filigree mermaid picture, sculpted octopus and lobster, mermaid mirror, clam tower with pearls, pastel french macaroons, weathered teapot and platter, bowed flower, seashells and water type plants.  Inside is a few little things like a pot of shrimp in sauce and a basket of seashells.  More photos can be seen here:
https://www.etsy.com/listing/186529047/dollhouse-miniature-nautical-mermaid'

I'll soon be back with more little projects.  I've really been missing my mini-making and I want to do a little more of it when I can.

Hey everyone, have a lovely spring and may all of your dreams come true this year :)  Hugs-Tara


Sunday, January 6, 2013

Dollhouse Miniature Wizard of Oz Theme Tree now complete

Sorry for the long wait everyone, but I've been sick with an undiagnosed allergy that's causing me a lot of grief right now and for the past two months I haven't been well.  Still trying to figure out what's causing it, still going through tests at the doctor's.  It's been crazy trying to figure out what's causing me to get sick.  I've tried everything, even pulling out carpet in my house in case it's dust or something like that and cleaning everything in sight.  No idea so far :(

Anyway enough of that, but that's why it took me so long to get this done and not in time for Christmas.  But I did finally get it done.  I'm really happy with how it turned out though!  I feel it's one of my best.  TONS of work though, yikes.  Some very difficult sculpting on this one.

I'll show you pictures and describe what I did below them:

     
Photobucket

This tree is wildly imaginative and so very cute in person. Photos never seem to capture the magic of the minis as they really are in person. There is tons of work in this tree, I worked on it for a month and a half little by little. So many completely handmade and pure sculpted items on this tree, including the flying monkey with real feathers all over him that I made from sculpting clay and then I hand-painted him and added feathers all over his body. I followed a photo of the flying monkeys from the movie as carefully as I could. Another pure sculpt would be little Toto the dog, completely haired in tibetan lambs wool. Squished underneath a large gift box is the Wicked Witch, her little black and white stocking legs sticking out with those famous ruby slippers on her feet. Next to her propped up by some little munchkin is her witches flying broomstick. On the other side of the tree is a piece of snowy ground with completely meticulously handmade red poppies as in the movie. Remember when the Wicked Witch casts a spell for poppies to grow up in between Dorothy and the Emerald City? They made her go to sleep. Glenda the Good Witch cast another spell for snow to fall on the poppies which woke her up, allowing her to get to the Emerald City after all :) And so, snowy poppies on the other side of my tree. Toto stands on the yellow brick road under the tree ready to begin the journey to the Wizard. Various beautifully wrapped gifts sit under the tree, most wrapped elaborately in beautiful fabrics and fluffy bows. On the tree, candles everywhere, gorgeous framed photos from the movie of the most important movie characters including the Tin Man, Cowardly Lion, Scarecrow, Glenda the good witch, the Wicked Witch, Dorothy, and one of the Wicked Witch threatening Dorothy. Also on the tree, hand-sculpted tornado ornaments with all sorts of things coming out of the top and gears flying along the side of the tornados as well. A sculpted pair of ruby slippers with little bows hangs right in the front of the tree toward the bottom where they can be seen well. All sorts of other things cover the tree but I'll let you look over the photos to see them all. These were the most important things I thought I'd mention. 

I'm very very proud of how this tree came out and though it was a lot of work, I feel it's one of my best and I'm thrilled with it :) It's lovely in person!

A smidge over 7 inches tall, the base is roughly 7 1/4 inches wide at the widest point due to the things sticking off of it and around it. This is a wider base to accommodate the various design features like the yellow brick road and snowy poppy field. 

Available here:  https://www.etsy.com/listing/119673356/dollhouse-miniature-wizard-of-oz-themed

Tuesday, September 11, 2012

Miniature Driftwood Fairy House Update

I'm trying to figure out my new camera so bear with me while I goof around and shoot bad pictures for awhile.  I'll get better as soon as I read up in my operators manual.  On this advanced of a camera, it's practically a full novel's worth of instructions :o

I still have to:
make a kitchen table
sculpt large mushrooms and scatter them around
work on the top floor of the balcony
work on the inside of the tower nook
make fruit for the bowl on the little table
make a rope ladder for up the side of the balcony

Then I should be close to done other than adding some more plant life around the scene.

Bad pictures in too dark lighting:


Little fairy pod beds with rustic tattered blankies :)


I know I can take better shots than this but I just don't know how to use this camera yet :)

Updated pictures with new items added in:


Thursday, September 6, 2012

Alice in Wonderland Mallymkun Dormouse in Dollhouse Miniature

I just finished her up today and I think she's really close enough to Tim Burton's dormouse version as seen here:


I tried to get her as close as could at my skill level in sculpting so hopefully you all think my version is passable:

Of course the glare here is much worse because the light is too bright outside.  Hopefully soon I can take far better pictures because my darling Mother in Law just got me a great new camera for my birthday and Christmas present this year :)  I'm so excited!  Finally I'll be able to take decent photographs without a huge different in how the minis look from the photograph to seeing it in person.  Can't wait!

What do you all think?  Does this look enough like her that you'd know who this character is if I didn't tell you?  Let me know.  Hugs everyone, now onward with the March Hare!  

Monday, September 3, 2012

A new Miniature Fairy House made of Driftwood

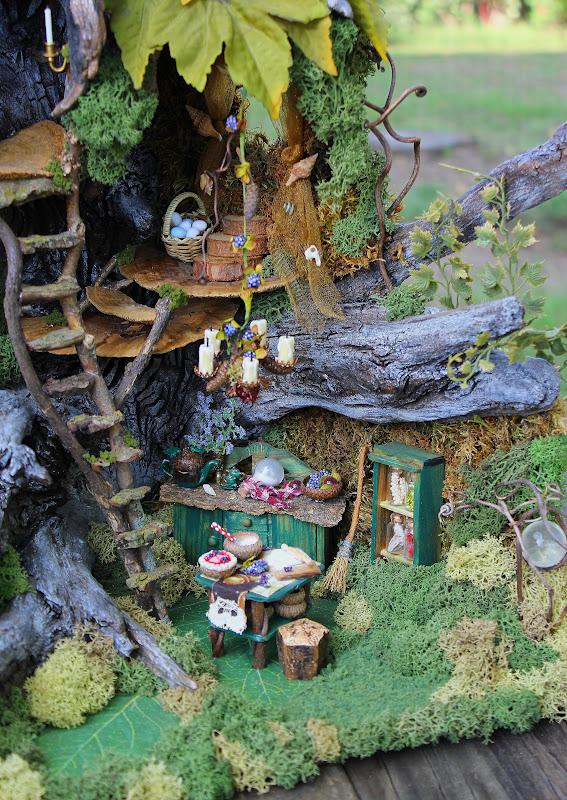
I had someone ask me if I could maybe make a fairy house out of driftwood.  I really hadn't made a fairy house from scratch so I wasn't sure if I could handle it.  I live right on the Mississippi River so where there be water, there be driftwood :)  I thought, why not?  I'll give it a go and see what happens.  So I asked my Dad if he could take me for a spin on the river and see what we could find.  A hike up a distant steep bank in the middle of nowhere and a heart attack later, I had a reasonable pile of driftwood that might be usable.  Haha, just kidding.  I didn't have a heart attack really, unless you count climbing over piles of driftwood and loose rocks that gave me the feeling I might run into a snake at any moment or go tumbling down the loose rocks into the river.  I had more than my fair share of panicky flutterings and near misses :)  Anywho, we got some driftwood and so began my experiment with fairy house building.  Of course there was none "house-shaped" or anywhere close to that.  Yay.  Here's what I have so far, and I have so much more to do to it.  A series of rope/twig ladders will be added to go from landing to landing, and more furniture will be built.  The whole point of this one is "natural" not cutesy.  More natural colors, less man-made things around it.  I have plans for a viney candelabra with drippy candles hanging from a high point down above the "room" area below.  And so much more moss and more twig furniture.  Etc.


      This will change a lot, this is a very basic start of what is to come.  All sorts of plans will come into play before the end and it'll really turn into a little habitat.  And it's quite large, 23 inches tall and 15 inches wide and deep, roughly.

I'l still be working on the Alice table in between this because I get burnt out and bounce back and forth between the two projects:)

Thanks for your comments everyone, I do read them even if I don't have a lot of time to comment back.  I've got lots going on around my house with the kids, cooking, cleaning, etc.  Busy Mom stuff, you all know how it goes!

Thursday, August 30, 2012

Alice in Wonderland Miniature Dollhouse Table update 8-30-12

I have FINALLY got this table all done!  Yay!  And it is a full as I could get it, echoing all the parts I saw on the actual table from the Tim Burton version of Alice.  Well not all of the parts, because the table setting kept changing! I paused the movie during the tea party scene from various angles and made everything I could fit on here that stood out to me on the table.  Today I begin the characters, first the door mouse.  I thought of making the stunning broken down windmill but decided that it couldn't just go anywhere so instead I'll be making the phonograph music player on a stand as seen in the movie.  Enough chatter, I'll just show you my icky glared up photos (Hopefully at some point I'll be getting a new camera).  I'll try shooting these pictures better soon.  The light was wrong outside this morning.


                     Nothing like a tower of sugar cubes to be really really tedious to make lol


Ugh this shot is so very bright it glares everything on the table :(  I just filled the teacups so they are bulging over right now but they will settle down as they dry up.

Gosh I hate my camera!  This is 100 times better in person and my camera makes it look bad.  Be back later with more pictures as I work on this.

Hugs-Tara, 19th Day Minis

Thursday, May 10, 2012

Update on the Miniature Misty Forest Fairy Refuge House

I'm trucking along as I can on this pretty little fairy house between work on my kitchen ceiling (yes still renovating this old farm house) and dealing with my very clingy new puppy who has a case of separation anxiety.  Sheesh, she is right under my feet all the time!  Lilybelle even had to be crated on a table beside my bed because if she can't see me she barks all night no matter what room she's in (we can still hear the little fluffball).  I tried putting her in bed with me but that didn't go well, I couldn't move and I had a living breathing very furry heating pad plastered to my extremely hot skin who wiggled and bugged me all night as well.  Wow.  Ok then enough about house and pet problems, ya'll don't come here to listen to that do you???  :)  Ok then.  I'm far from done but I have a respectable start at least.  The inside is almost done.  I just need to put a couple little fairy dishes on the mushroom table and the inside is good.  The outside will need a lot of TLC before I'll call it good.  I do like the leaf-drip water feed system for the bathtub, which had to go outside due to room constraints.  The roof will have water drips too as though it has been raining in the Misty Forest where this little house has been standing for quite some time.  At least that's how I hope it comes across.  I never see any fairy houses with water features so I wanted to do one.  Not only for uniqueness but also for the look of it.  Water is pretty to look at.  I think it should be essential for anything fairy related and I plan on adding something with water to every house from here on out.  I think my own unique way of doing water (which is time consuming and painstaking but worth the end look because my water is vibrant-colored.  This water feature took me two days of work on just that.  But I love it so it's worth it in the end.  I'll just show you what I did now:

Lots of glare going on in these photos but you get the idea.


I still have work to do on the outside of the house, so what you see now might change some.  And I plan on leaving the roof removable so that whomever buys this can peer inside and see everything.  The lid will set on and you won't know from looking at it that it can come off so visually it'll still look good.
            

Monday, May 7, 2012

Another 19th Day Miniatures fairy house project under way

I've started another fairy house, my last one of the year as far as I know.  I'm eager to get back on some witchy minis, the steampunk/mad scientist lab house that's my fall spooky project, as well as a project that I've been thinking of doing for quite some time.  I've penciled in one last Alice in Wonderland project, but not just any project.  I've wanted to do the tea party scene for quite awhile, and I'm doing it some time this year.  And when I do it, it'll be done to the very best of my ability because there's something about it that I've always loved.  It's so preposterous and funny I guess.  Absurd, and it just tickles my funny bone :)  I've always known I would do it at some point.  But I have a few projects ahead of it to do so stay tuned.  Matter of fact I think at some point I might do two different versions of it, the standard one, and one that's very "malice in wonderland"....completely goth and disturbing!  How would that be for a Halloween decoration, a spooky Alice decoration?  Sounds fun to me!  Anywho, I'll shush up and just post some pictures of my basic start on this fairy house.  So much to do yet, lots of mossing inside the house before I can glue furniture in place.  I also need to finish trimming out windows and areas with twigs.  And I have a couple of lovely fairish things that go on the walls as well so it's not how it will look in the end inside there.  Here's some pictures of what I've been making:
This is a twig stand I made with a mossy shelf on top and a basket of floral things underneath.  On the shelf are little fairy potion bottles and a couple of red apples.  I couldn't get a decent shot of this, it's quite pretty in person-more so that you can tell by this.  This will go in the back corner of the cottage.  I think I might make it so the top can be removed from the house so that things could be added or so that you can get a bird's eye view of all the things inside the house.  The top is removable right now, I usually glue them down but this one I might not. 

This will be the little fairy bed, made on a half shell with a leaf canopy and hand-crocheted bedding.  This picture is horrible, I might have to retake these later.  It's rainy and dark here right now, and it's affecting my photos badly.
One of those little fairy tubs I make with the shimmering blue water.  This and some bath things will be mounted up high in the room against a wall because after all, fairies can fly!
A twig bench and a mushroom table will round out the kitchen setting nicely :)  Again, BAD pictures :(  I am so sick of this weather here! Grrrrrrrr!

Again, difficult to see here but that would be a sink basin on the tree bark counter top with a water pump with water running into the basin.  On the floor sits a bucket of brown mushrooms and vegetation growing.  The inside of the house I wanted to look mossy, damp, and aged like it had sat on the forest floor in some hidden place for a very long time.  Still so much to do to it though before I glue down furniture. 
Still lots of twigging and mossing to do in there.  I might make rustic little curtain panels, don't know yet.
Stay tuned for updates :)  Thanks for stopping in everyone and have a wonderful day!


Thursday, May 3, 2012

Now listed for sale-Miniature Alice in Wonderland Rabbit Hole Scene complete, available for sale tomorrow night :)

New pics:


These below will be dark inside shots of the lights inside the rabbit hole lit up:


Previous pictures below:


Layers of the earth in sand and stone with a poly coating over it.  Very sturdy!

Can't clearly see "Dinah" the cat here in this shot but she's up there looking down the hole.


This shot is to show scale, taken next to my teenage son.

Anyway, it'll be listed tomorrow night after I package it up and get a shipping price idea from the post office on international and domestic.  I know for sure this will have to ship at the higher international rate because the box will be too big for the cheaper option.