Wednesday, February 29, 2012

March Madness Sale :)

March is a month of birthdays for me.  So in honor of the loved people in my life I'm offering a....

Sale :)  Here's my store link:

15% off all store prices, just type in coupon code "marchmadness"
during checkout (excludes custom orders).


Had your eye on something in the store but thought you didn't quite like the price?  Here's a percent calculator that will show you how much you'll save with the 15% off.  Just type in the price of the item you like (not the shipping included), then type 15 in the percent box, it will calculate your savings and show you if you like the "new" price :)


Happy March to you all my dears!
Oh and welcome to any new followers, we're glad to see you here!

Monday, February 20, 2012

Updated-Another Dollhouse Miniature Harry Potter Honeydukes Cabinet with a twist!

Updated pictures of the completed cabinet here and it's available for sale here:  http://www.etsy.com/listing/93571934/dollhouse-miniature-harry-potter


Wires taped flat yet still assessible should you need them by gently lifting the tape up (and I've folded the bottom of the tape over so there is a place to grab that isn't stuck to the cabinet back).  This will sit nearly flat against your wall now.  And this will be hidden from view because it's on the back :)  And the bulbs can be changed out, which I think is important for the longevity of the miniature.  No matter how many years of use it gets it'll never be no good due to wiring or bulb issues. 

Here's a crappy night-time picture that I tried to shoot in the dark because I wanted to show the pumpkins lit up.  And it doesn't matter if the little bulbs warm the pumpkins slightly because everything is made of metal and clay, and they can take it :)  It is oven bake clay after all!

I've recently discovered the fun of working with dollhouse lighting and as such I decided I'd like to use it on a Honeydukes Cabinet.  A lot of people have Honeydukes shops but what most don't have is a lighting cabinet.  So that's what I've put together.  The inside is a regular candy jar cabinet, but on top...four pastel candy container jack-o-lantern pumpkins, inside they have a full dollhouse-size, changeable lightbulb (in case one burns out you can replace it) that is wired to a 9 volt battery which will be included.  I have to make a barrel container for the battery pack with some lollipops sticking out the top.  The backside will be open to allow the battery pack to slide in and out easily.  If you are in a foreign country and you want this (I have no idea if you all have the same batteries that we have in the US)  If you want I can add a few dollars onto the purchase price and include some extra batteries for you.  A 9 volt battery should last awhile if you don't leave it plugged in all the time.  I haven't taken off the extra wiring on the back of the piece should you want to wire this into your dollhouse wiring so that it can be lit electrically instead.  I'll just tape the wires down flat so that the cabinet can be placed against the wall without any trouble.  This way you always have the option of wiring them directly into your house should you get tired of the battery option.  The candy container battery cover I'll be making at the side won't look like anything other than a barrel of lollipops so that will never be a problem :)  I have to pack up the witch bath set and a cabinet today to ship that out but I'm hoping I'll have time to finish and list this either late tonight or early tomorrow.  So if you like it, be watching!  It might not last long in the store, especially with the layaway option that we have at 19th Day Minis :)

I'm still having really bad trouble getting good pictures here due to winter time, so keep in mind this is about 100 times better than these icky pictures show!


As you can see the wires are just hanging there right now.  I'll have to secure them down after I get this battery pack cover made.  Until then I don't know where's a good spot to tape them down.  They look kind of awful right now but I'll fix them as best as I can before it's all over.  Like I said I don't want them clipped off because they may be needed by someone to wire them into a house or roombox.  You can see by the glare around the lights the pumpkins are currently lit up in the photos :)

Oh and welcome to any new members that have recently joined!
         

Friday, February 17, 2012

Dollhouse Miniature Witch Bath Set :)

I wanted to put together a witchy little bathroom set for anyone who might have a witch cottage or might be thinking of making one.  You never see witch bathroom items (or at least I haven't) so I thought it would be fun to make.  Most dollhouses have enough rooms to be able to do a bathroom as well.  So here's what I did: 

The four piece set includes a laundry hamper with "dirty" clothing, an old fashioned wall tank toilet with pull chain (which is hanging crooked in this picture but isn't in person) and a tiny owl on top, a filled claw-foot tub with old fixtures, drippy candles, swimming frog, towels, and a potion is pouring into it from the pedestal attached to the tub.  This pedestal has three witchy potion bottles.  Also included is a pedestal sink with a very unique double crescent moon mirror (one has a witch laying back on the moon).  All of them have been painted black with a sparkly slime green drippy paint job that looks uniquely witchy and yet still a little posh.  I like to think of this set as "witch chic" in design :)  Not all witches are unstylish old hags, just ask Hermoine :)


The wind was blowing the feathers on the witch hat around on that clothes hamper :(  Oh well, you get the idea.  And the pull chain on the toilet is hanging weird but it can be moved around to look right.  I just missed that it was crooked when I was shooting the pictures.
Available for sale here:   

Tuesday, February 14, 2012

Miniature Alice in Wonderland Rabbit Hole updates

Ok, I worked my way through my chimney troubles with the fireplace.  It's all in there now except it has nothing on it yet as far as decorations on the mantle, etc.  I still have to do that part so this is just a basic sculpted clay structure I made at this point.  And after I get the ac adaptor rigged up both the table lamp and fireplace light up.  I tested them as they are now with a 9 volt battery and they both work.  I actually have the bottom of the table removed right now due to needing to get the fireplace chimney in there but I'll reglue it after I finish blogging this update.  It's rather hard to see in these photos but there is a tiny little man face on that doorknob down below that looks just like the one in the original disney cartoon movie.  And keep in mind this is a cartoon version of the rabbit hole, based on that disney film not the Tim Burton version with live actors.  So everything needs to be cartoonish in design :)  Here's what I did:


The light was bad outside by the time I shot these so they are blurry :(  Can't help that right now but you get the idea.  See how the colors and style is very cartoonish?  That's intentional.  There will be so much more to this in the end it'll be shockingly different in the end :) 
     

Saturday, February 11, 2012

Updated Pictures-Dollhouse Miniature Harry Potter Professor Quirrell's Iguana Enclosure done

Remember the bad guy at the end of the first HP film? 
Quirrell then sent a forged letter to Professor Dumbledore summoning him to the Ministry of Magic to get him away from the school. He went after the Stone, but was followed by Harry Potter, Ron Weasley and Hermione Granger — though they believed their enemy to be Severus Snape.   Quirrell non-verbally bound Harry and summoned a wall of fire behind the door to prevent him from escaping, then, on Voldemort's command, forced Harry to look into the mirror. Harry saw his reflection with the Stone in his own trousers' pocket, and felt it indeed being transferred to his real pocket. When Harry lied about what he saw in the mirror, Quirrell unwrapped his turban to reveal Lord Voldemort's face, bound to the back of his head.

Quirrell and Harry struggle for possession of the Stone.  Quirrel's life ended then, when Voldemort forced him to attempt the murder of Harry Potter (figuring out Harry had the Stone and being unable to persuade him to give it willingly). Unfortunately, the body Quirrell and Voldemort were both sharing manifested in burns and blisters during his fight with Harry due to the protective power Harry's mother left in his skin when she died for him. Harry collapsed from the pain in his scar, but Quirrell's body was burnt so horribly that Voldemort dispossessed his body and left him to collapse and die. However, despite being effectively turned into a living Horcrux for the last year of his life, Quirrell did not ultimately lose his soul, having even tried to put up feeble resistance on occasion (in spite of the fact that Voldemort was far too strong for him).

Inspired by this scene from the movie of Professor Quirrell holding up a large iguana:


I decided to try making a wizard-style iguana enclosure. 

I was working on the rabbit hole scene, and turned out a very good fireplace and managed to get it wired so that it would light, as well as a small table with a working light on it that will light at the same time.  Then I started the chimney part that curves up and around the wall-hit and snag and messed up.  I pulled it off and have to start a new one.  I decided since I was frustrated that I had better put it down for a little while and make this.  I don't want to do a bad job, so when I need a break from it I'm going to take one :)  The fireplace itself was completely hand-sculpted with a working log set inside that looks on fire when it has power running to it.  I was proud of how it came out, until I started the chimney and messed up.  But the mistake is gone now and waiting for me to try again.  And try I will now that I have this mostly done.  I didn't add on the front window glass because I didn't want the glare from the camera showing up on it.  So as soon as I get back from town I'll put that one and list the iguana for sale.  Here's how I did:


So I'll add a couple things of feed underneath the cabinet as well.  And yes as always this looks so much better in person!


Wednesday, February 1, 2012

Ball Joint Doll Elfish Apothecary Chest Complete

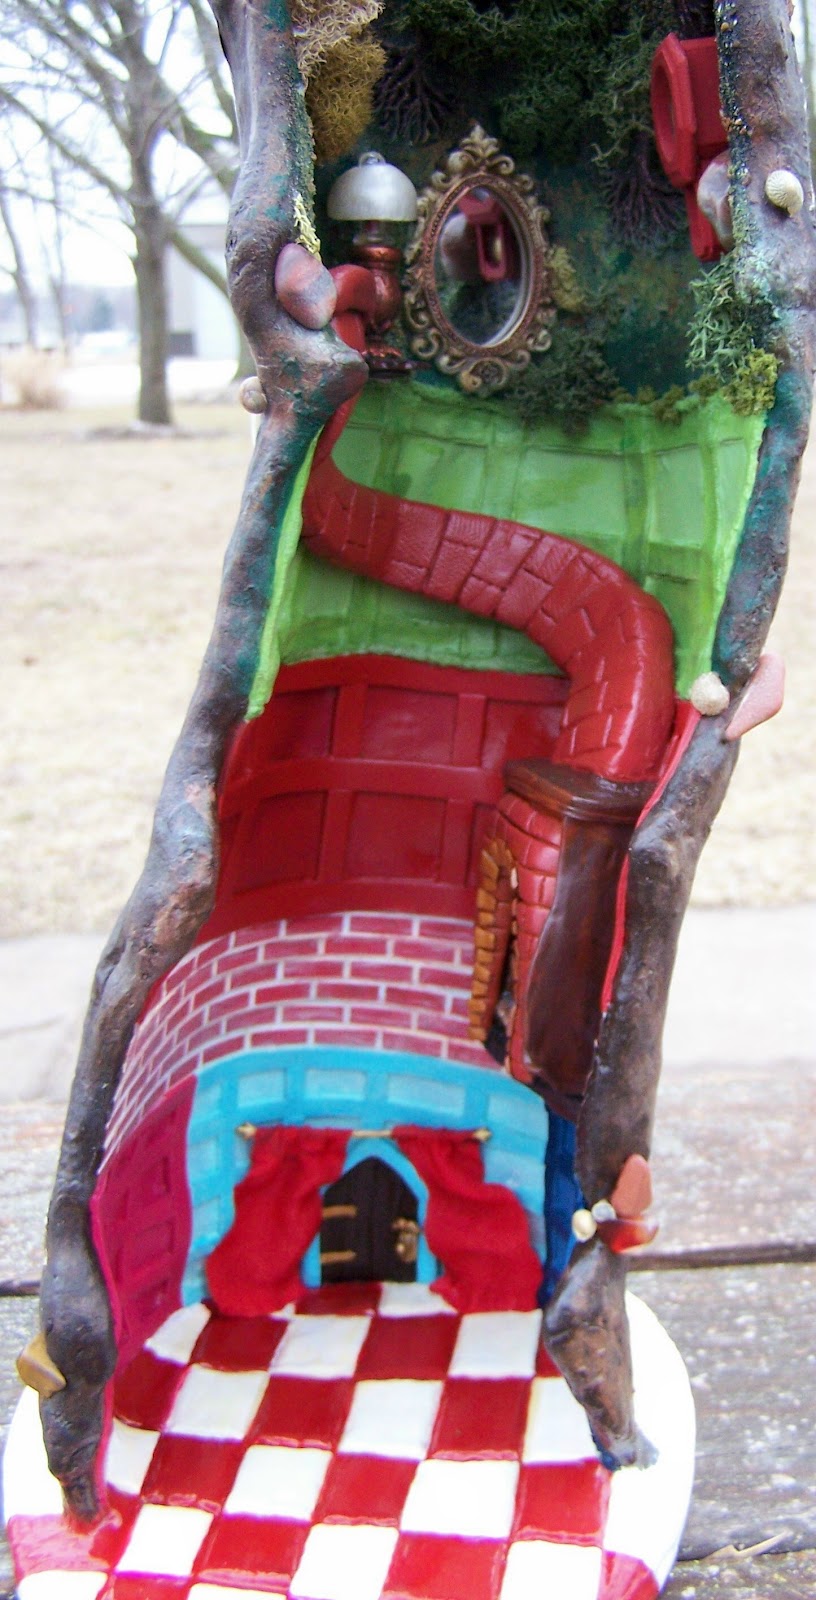
Whew, that was a hard one!  I think I did ok considering I started with nothing but some sheets of wood and built this from the ground up :)  And I'm proud of how it turned out, although my pictures are crappy like usual (awesome camera of mine) :(   Anyway, this is how it started:

and this is how it ended:


Now no one get excited, because these are LARGE potion bottles compared to what we all collect!  The tallest is around 3 1/2 inches tall so not 1/12 scale.  And the sand timer?  Over 4 inches long!  This is just a sample of the bottles I made for this, there are so many more.


What's in this?
Top lid ingredients are as follows-


seeing stones

dried jasmine

bluebird feathers

spring sprigs

snail shells

heather flowers

wild berries

nibbles

forest floor

magic toadstools

and one elfish dispensary spoon


side doors that swing open:

purity potion

elixir of divine endurance

essence of the wolf

shape shifting aura

fairydust

essence of the sea


first drawer of the apothecary:

birds nest with eggs labeled "relocate to tulip tree"

two perfumed oils with acorn cap lids

one jar of hippogriff feathers

one chinese-style metal chest containing a beautiful chinese fireball dragon egg

a bottle of the first spring flowers

a mortar and pestal with unspecified ingredients inside

two unspecified vials of potion

one bottle of giant octopus ink


second drawer of apothecary:

mushroom box of candied rose petals

mushroom box of seashells

hand-dyed silk bowed container of mermaid scales

metal container of far east spices

bottle of "sands of the undying lands"

chilled box of first winter ice

bottle of giant beanstalk seeds

a bottle of enchanted sleep

a vial of ghoul ash

and one fancy sand timer vial